Using “Recolor Artwork” in Adobe Illustrator
The right tool for a colorful task
Read More
The right tool for a colorful task
Read MoreAdobe makes Bridge useful again.
Read MoreOne of the benefits of Adobe’s Creative Cloud subscription system is that new software and features can arrive at any time. The downside is that a confusing feature can arrive at any time, as well.
One day, when I selected a word in InDesign, an odd blue line appeared on the first letter. I was confused for a second until I realized it was a new feature intended to access OpenType alternate characters. OpenType can be confusing and so I applaud Adobe for trying to make alternates more accessible. But it took me a few minutes to figure out how it worked, because the behavior changes based on what you select. (If you want to try it out yourself, select an Adobe Pro font… For this demo, I chose Adobe Caslon Pro Italic.)
Here’s what happens:

You select a word. The first letter of the word with an OpenType alternative will be highlighted with a blue underline. In most cases, that’s the first letter. In some cases, it may be the second or third letter. If you click on the underline, you will see your OpenType options underneath it. If there are more than five alternates, then you can click the arrow on the right to open the Glyphs palette and see all your options. It’s important to note that if you select a word, only the first letter with an alternate will be highlighted, even if other letters in the word have alternates available.

You select more than a word. The blue line will not appear for any character.

You select a single character anywhere in the word. You see all available alternates for that character.
I suppose this is helpful for discovery. With Adobe Caslon Pro Italic, many of the available alternates are superscript letters, patterns or dingbats. In most cases though, I think it’s still easier to access OpenType features from the flyout menu on the Character palette.
If you just find the blue line annoying, it’s easy to turn off. Just go to Preferences > Advanced Type > Type Contextual Controls and uncheck both options.

Bob Wertz writes about design, technology and pop culture at Sketchbook B. Bob is a Columbia, South Carolina-based designer, creative director, college instructor, husband and dad. He’s particularly obsessed with typography, the creative process and the tools we use to create. In his spare time, he digs through the preferences of InDesign looking for helpful features. Follow Bob on Twitter and Instagram.
I wanted to create a PDF of some pages in an InDesign document, but I needed them in a different order in the exported PDF — page three followed by page two. I know, weird. So I was going to make the PDF and then rearrange the pages in Acrobat.
But as I was exporting the PDF, I wondered what would happen if I typed exactly what I wanted in the page range field. I typed “3,2” and hit the export button expecting an error message…
Magically, my PDF outputted correctly with page three first, followed by page two. Mind. Blown.

To export these in order, type "2-4, 1" in the page range field and the exported PDF will be in the correct reading order.
Turns out the range field has other tricks, too. I tried “3,2,4,3,2” expecting it to give me an error message. Nope. The resulting PDF had all five pages, in that order… including the multiple pages.
The most practical use for this little trick is when you’ve set up a brochure with the back cover and front cover on the same spread and want to export the pages in the order a viewer will see them. Typically page 4 is first, followed by 1-3. So type “2-4, 1” in the page range field and the PDF will export in the correct reading order.
It’s a nice touch. And I had no idea the feature was there.

I restarted my Wednesday Adobe Quick Tip a few months ago, but I figured I’d highlight my favorite tips from the last year to make you a more efficient Creative Cloud user. Although I post tips from other Adobe apps, most of them — including my favorite four below — are for InDesign:
That one weird little InDesign printing trick. I had no idea how easy it was to print a single spread in InDesign.
Hidden alignment. For some reason, the most helpful InDesign alignment options are hidden on the Alignment palette.
Moving InDesign pages to different documents. The easiest way to combine pages from different documents.
Paragraph shading. A new feature in InDesign CC 2015 makes paragraph shading really easy.
But by far, the most visited page on my site is a tip from 2009 on how to create an Instagram-like vignette effect without leaving InDesign. I’ve updated the post in 2014, but Google really loves the old post.
My plan is continue the weekly Creative Cloud quick tip into 2016. You can see all the tips from the past several years on my Creative Cloud Quick Tip page.
Years ago, Adobe added a “Quick Apply” feature to InDesign. I have no idea when, but it’s been awhile.
Quick Apply opens a window with all sorts of selections in it. You activate Quick Apply by clicking on the (very prominent) lightning bolt in the command palette, or by using the keystroke Command + Return. By default, it includes all your style sheets, menu commands and more. And you can search the options… it kind of tries to be Spotlight search for InDesign.
I saw it demonstrated, checked it out and had absolutely no use for it. I never used it again.
But the other day, I accidentally activated it and started to check it out again. And it’s a little more useful than I first thought.

In the top of the bar is an arrow that lets you select what is shown in the Quick Apply window. By default, there are too many options to be helpful, but by customizing what shows up, it becomes more useful. I turned everything off except the style sheets. Now I can select some text or an object, hit Command + Return and apply a character, paragraph or object style.
(I’m not sure why you would want menu commands to come up in the Quick Apply window. Yes, you can search them, but there are so many, it’s tough to get a helpful result.)
Quick Apply might save a little bit of time, but for me, the real benefit is for users with smaller screens. Using Quick Apply, you can apply any style sheet without having a bunch of palettes open. Should reduce clutter and be a real space saver.
Years ago, Adobe introduced Kuler, a tool for selecting colors and groups of colors. I always enjoyed playing with it, although I rarely exported the palette I created and imported it into an Adobe app.
Kuler is now Color CC and is still available as an online tool. But Color CC is incorporated throughout Creative Cloud as Adobe Color Themes:
Integrating Color CC throughout the ecosystem is just another way Adobe is merging their online tools, applications and cloud experiences. They are slowly adding more and more value to the subscription.

The Color Theme palette in Indesign CC 2015
* The Capture CC app replaces the older Color CC app and includes more than just color features. But we'll save that for another tip.
By default, InDesign's spell check is manual. You go to Edit > Spelling > Check Spelling... and run the spell check on the selection or document. I had a student the other day wish that InDesign could put the little "squiggly line" underneath misspelled words like other apps do. And he was shocked to find out that InDesign already has that feature. It's called "Dynamic Spelling" and you just have to turn it on.
There are two ways to turn Dynamic Spelling on. You can activate it from the menu at Edit > Spelling > Dynamic Spelling. Or you can enable and customize Dynamic Spelling a little bit by opening the Spelling preference panel. InDesign lets you change the colors for different types of errors.

One note about the way InDesign works... You can only see the squiggly lines in the Normal view mode. If you are in Preview, Bleed, Slug or Presentation mode, the lines won't show up. This makes perfect sense, but I know lots of folks who design in Preview mode and they won't be able to see the squiggly lines.
Let's say you've got some words that you want to spread out evenly across a page in InDesign. I've seen this done a bunch of different ways — and most are completely inefficient. Here's the easiest way I know to do it:
You have a list of locations (A). Here I've used names of cities in South Carolina. Type them out with one space between each word and then "justify all lines." The words will now be stretched out across the entire text box (B), evenly spaced. And as a bonus, it's easy to edit if necessary.
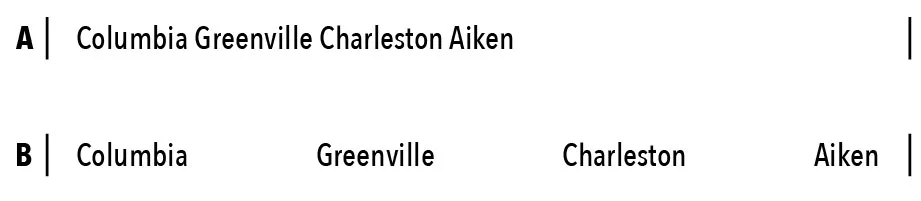
But what if instead of four single words, you have grouping of words. Here I've added "Mt. Pleasant" and "Myrtle Beach" to my list of South Carolina cities (C). If you simply justify them, the words all space out as expected. (D)
But you want the city names to stay together, so what do you do? Replace the normal space with a fixed width, non-breaking space and keep the word groupings together. Go to "Type > Insert White Space > Non-Breaking Space (Fixed Width)" to place the special character. If you add the fixed width space to "Mt. Pleasant" and "Myrtle Beach," InDesign will ignore the space in the middle and treat the word pairs as single words (E).
It's a simple tip, but a time saver if you ever tried to build something like this with tabs, or god forbid, separate text boxes.
I don’t think I’ve ever posted a tip for Adobe Acrobat, but I found something this week that was amazingly helpful.
I had a large file with many pages that I needed to email. (Dropbox and other sharing services weren’t an option for this client. Only email.) I needed to divide the PDF into several smaller PDFs. There are many ways to do this, but most require some trial and error.
I stumbled across a feature in Acrobat that lets you split a PDF into multiple files and allows you to set a maximum file size for each resulting file.
NOTE: I’m writing this tip about the current version of Acrobat that is included with Creative Cloud. The Adobe Acrobat DC (2015) interface is wacky and a radical departure from everything else Adobe makes.* It’s closer to the current version of Microsoft Office than Creative Cloud.
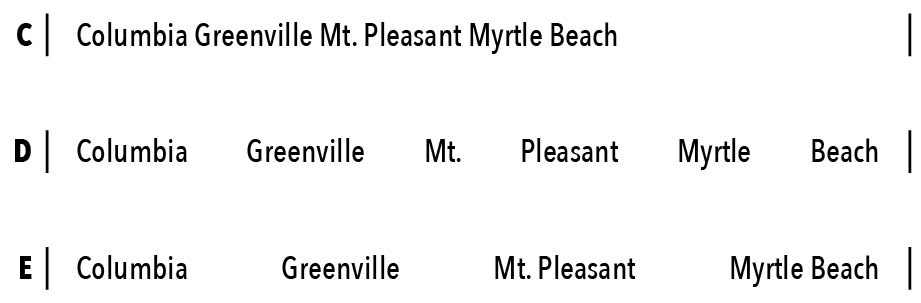
Open your massive PDF and then click “Tools” at the top of the open window. You’ll come to a page with lots of icons for editing functions. Select “Organize Pages” from the “Create & Edit” grouping.

Select "Organize Pages" from the top row.
At the top of the window, you will now have an button for “Spilt.” Clicking “Split” opens up a row below with more options. By default, Acrobat will split your document into multiple files with an equal number of pages, but if you select the “Number of Pages” combo box, you get additional options: “File size” and “Top level bookmarks.”
The toolbar for "Organize Pages" has the "Split" command.
Choose file size and then set your maximum file size. Click the split button and the separated files will be saved to your desktop.
The options button for the “Split” row gives you complete control of how and where the files are saved. So if you need to use a particular naming convention or have Acrobat save the new file to a specific directory, you can make those changes there.
If you absolutely need to email a PDF and compressing or downsampling the file isn’t an option for you, then “Split” will absolutely save you time.
* I’ve been told the Acrobat team and the Creative Cloud team are completely separate. It looks like it.
This week, I needed to copy pages from one InDesign file to another. Thankfully, it’s super easy.
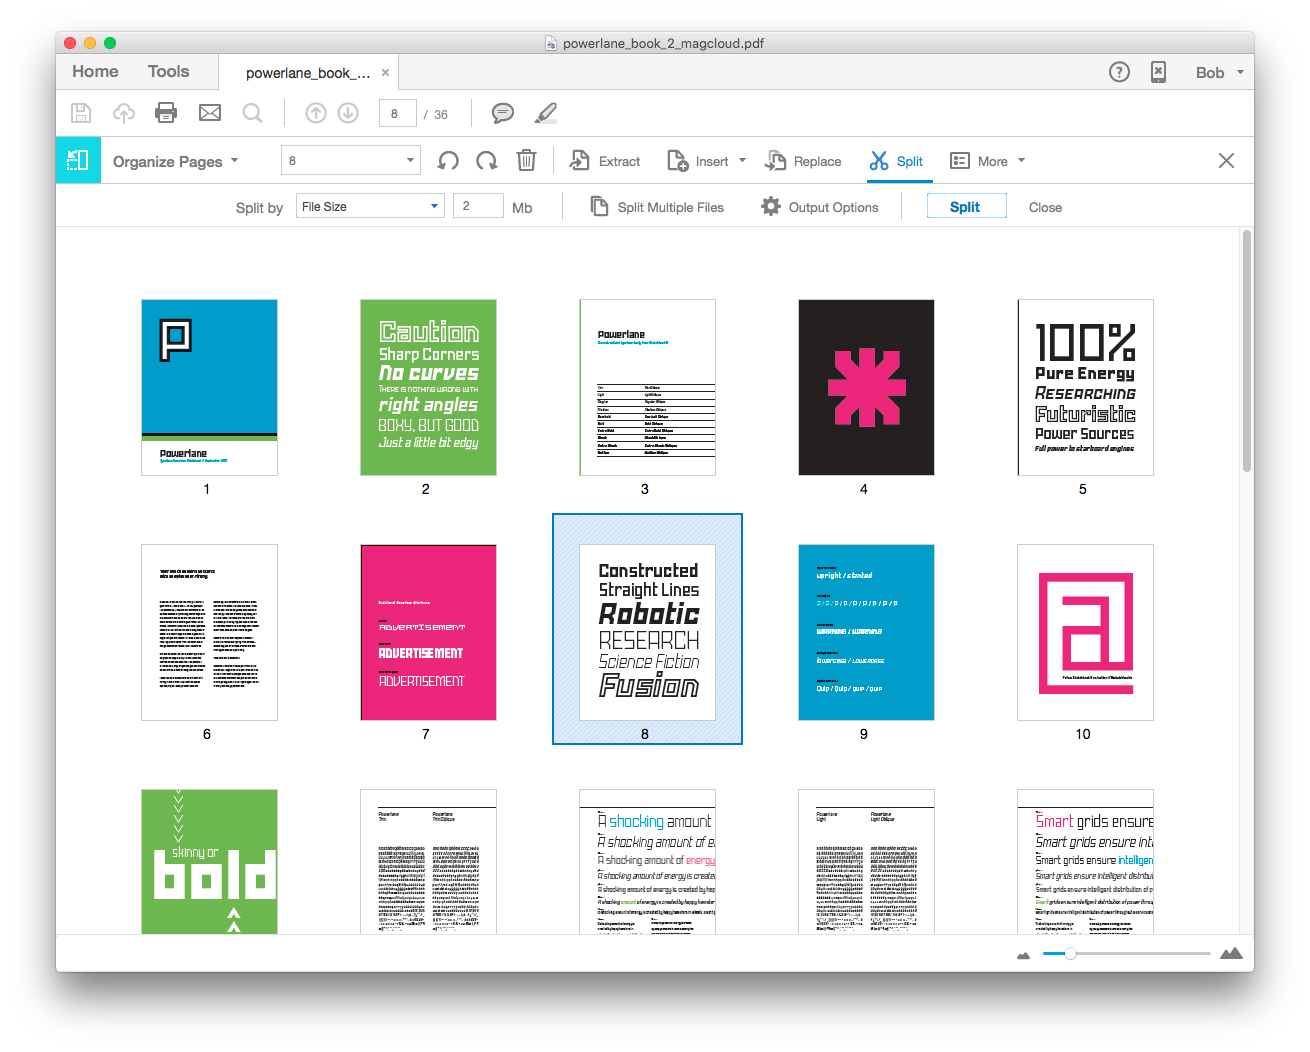
Select the page you want to copy from the pages palette. Choose “Move Pages…” from the flyout menu on the pages palette. (Or Layout > Pages > Move pages…)

You can then choose which pages* you want to move and where you want to move it. The default is to move the pages to another spot in the same document, but you can select any document that is open.
Select the destination with the "Move to:" combo box.
And you are done. As a bonus tip, there's a similar trick in Photoshop, too, that I've written about in the past.
* In case you were wondering, it doesn’t matter if the documents you are merging are different page sizes.
Want to work on something in detail without losing sight of the big picture? InDesign has a solution for that.
In the lower right hand corner of InDesign CC 2015 is a button with two rectangles. Clicking on that button splits the view. (Or if you prefer menus, go to Window > Arrange > Split Window.) So you get you two views of one document in the same window.

In the lower right hand corner of the window is the split view button.
You can also easily scroll to different pages and copy and paste from one section to another. Or even work on a master page while you look and the pages in the document.
It comes in handy, especially on a large screen, and saves time when working on complex documents.
Over the last two weeks, a 2010 post of mine on rounding corners has suddenly become very popular.* I wrote it for CS4 and posted an updated version for CS5. But I wanted to revisit the tip and update it for Creative Cloud 2015.
The process for rounding corners is actually more complicated than I expected and is different depending on what shape you are working with.
Rounding the corners** on a rectangle is straightforward and there are actually a couple of ways to do it.
The yellow box method: When you click on a rectangle with the selection tool, a yellow box appears near the upper right hand corner. Click the yellow box and diamonds appear at the corners. Drag the corners inward to round the corners equally.
To round only one corner, click the yellow box and then, while holding down shift, click and drag on the corner you want to modify.
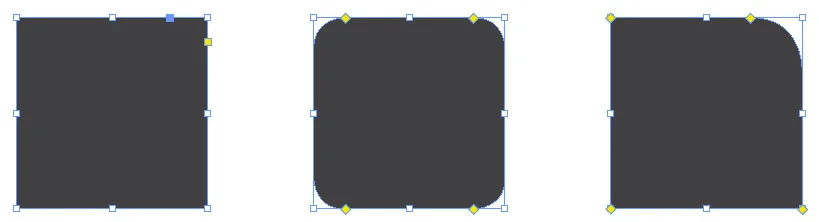
(1) Click the yellow box in the upper right hand corner to edit the corners. (2) Drag the diamonds to change the amount of the corner effect. (3) Hold the shift Key to change only one corner.
The dialog box method: If you prefer a little more precision, you can go to Object > Corner Options… and set the rounded corner to a specific value. And it’s easy to round one corner.
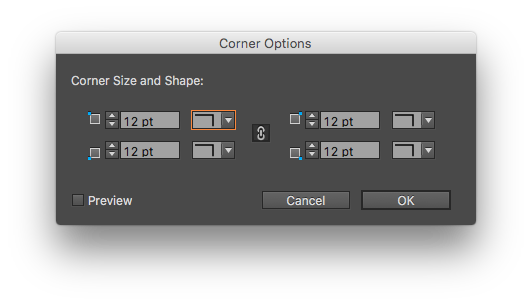
Set the amount and style of your corner effects with the corner options dialog box. Uncheck the chain icon to set corners independently.
The control palette method: You can set a rounded corner value for all four corners in the control palette.
The corner controls are easy to find... It's the only icon in the Control Palette with blue dots.
So rounding corners on rectangles is easy, but what if you don’t have a rectangle. It’s still easy, but different.
The yellow box method: Doesn't work. The yellow box appears only for rectangles. Triangle, trapezoid, hexagon… no yellow box.
The dialog box method: Works just like it does for the rectangle with one, major exception. You can’t round individual corners. All of the corners have to be exactly the same.

Try to change the corner size or shape on a shape other than a rectangle and all but one input field is faded out.
The control palette method: Exactly the same as the rectangle method, with no control over individual corners.
So let’s say I want to round selected corners on any polygon. None of the normal methods will work, but thankfully, Adobe provides a script for this.
The scripting panel (Window > Utilities > Scripts) contains an Application folder with sample scripts in Applescript and Javascript. Select the “CornerEffects.applescript” or “CornerEffects.jsx.”
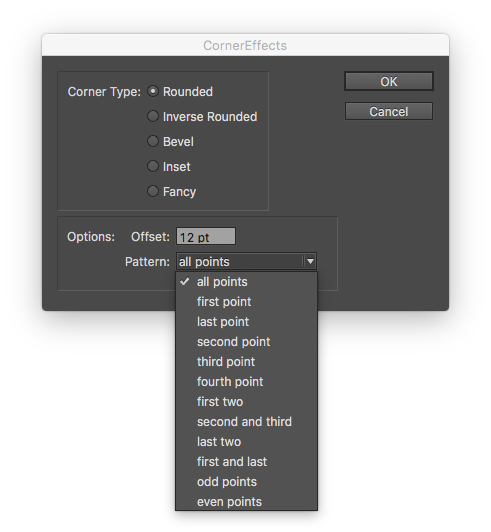
The top part of the dialog box essentially provides the same options as the “Corner Options” dialog box. And the offset box allows you to adjust the size of the corner. The Pattern combo box defaults to “all points,” but take a look at the options available: first point, last point, second point, third point, odd points, even points and more…

When applied to a box, it gives you the ability to round or bevel selected corners. Sometimes, it takes a little trial and error to figure out which point the “first” point is. The first point usually seems to be point in the upper left and then selection moves counterclockwise.

Pretty much the only way to make these shapes in InDesign is with the Corner Effects Script.
You can also use the odd and even points patterns on a star shape. “Odd points” effect the inside points. “Even points” modify the outside points.
That should help you round any corner you need. As an aside, Adobe Illustrator has a completely different and superior corner rounding process. Personally, I hope that Adobe adopts the Illustrator method in InDesign.
* Google works in mysterious ways.
** You can do more than just round corners. You can bevel them or create several different effects. But most people just want to round them.
Adobe added a new* library feature across all of Creative Cloud. It’s easy to use and I think it will become a really integral part of design workflow in the Adobe world.

A library of random Sketchbook B assets.
At first, the library appears to be just another palette in the vast forest of palettes. But it's easy to add images, color palettes, style sheets and more to the new library via drag and drop or by clicking the icons at the bottom of the palette.
Library assets are then accessible from most Adobe desktop and mobile apps.** Drag a logo into your library in Illustrator... place it in InDesign or Photoshop.
It's also an integral part of Adobe's vision for how mobile devices fit into the design environment – an easy way to share assets between different types of devices. For example, Adobe Comp CC, a mobile layout app, uses your library to pull appropriate graphics, stylesheets and color palettes, on your phone or tablet. Even if those graphics were created in InDesign or Illustrator.
Try it out. You might find that it's a useful feature to have if you have a client library that you need to share between apps or designers.
* I remember a similar feature in Quark Xpress years ago. But the benefit of the new library is how you can access it from any Adobe app.
** It looks like other, non-Adobe apps can access the library, too. But I don't think anyone supports it yet.
If you’re like me, your clients have all sorts of brand names, executive names, cities and URLs that give InDesign’s spell check fits. But you don’t have to just click “skip” repeatedly during a spell check. Add these to the user dictionary.
Pull up the user dictionary by going to Edit > Spelling > User Dictionary… and add your terms here. If you want a name or URL to be case sensitive, check the case sensitive box.

This is particularly helpful for URLs with creative capitalization. If I want “sketchbookb.com” to always be “SketchbookB.com,” I add “SketchbookB.com” to the dictionary and check the case sensitive box. Now if I type “sketchbookb.com” somewhere, spell check will recommend “SketchbookB.com” instead.
Bonus tip: Using the import and export buttons, you can share your user dictionaries with your coworkers.
I post quick tips for InDesign and other Creative Cloud apps on Wednesdays.